


Bed building phobia squashed (woo hoo). Miss Kitty's self potty training underway (check). Garden raked, lawn fertilized and front garden dug up (check), back garden soil 50% turned (check). Ok, now back to mini making and blogging!
As you may recall I purchased the Ikea "Sy" sewing machine. I still love it. I think I have jammed that sucker up and done everything possible to it as I've taught myself to sew. All I can say is thank you Ikea and your YouTube tutorials. Without them, it would have been tears and a return to iron on hemming.
Off to Fabricland I went! Oh, fabric scraps, how you tempt me. My fabric box is officially too small, but I now have lots of great fabrics to work with and most scraps cost me less then $2.
The bedding consists of 2 items, a used pillow case and some short pile charcoal velvet. Velvet tip: since you likely need to iron it, make sure you put a towel between the iron and the velvet. NEVER iron direct on velvet or say bye-bye to its pretty appearance.

Remember, I am a previous non-sewer. I'm sure this is technically atrocious for those of you good at sewing. But, if you're like me, you can do it!!! I had no flippin' clue what I was doing but it worked out. Only took me 3 hours to do it all, but I got there!
Nothing beats learning to sew with your iPad.

This is my pillow case. Very soft, 600 thread count, and washed a million times. The fitted sheet looked sad, but the pillow cases were just to perfect for this to pass them up.
I used the pillow case for the "fitted" sheet, the top sheet and the pillow cases.
The Pillows
2 1/4 x 1 3/4 inches were the dimensions of the the pillows (unstuffed, just stitched). You loose a bit when you stuff them, so regardless of the dimensions you use for your bed, make it a little larger to accommodate for stuffing size loss.
Step 1
Cut your pieces of fabric a good 1/4 to 1/2 inch larger then were you plan to stitch. You can always trim excess fabric away, and its easier to handle a larger rectangle.
Fold over 1 edge and make a simple straight stitch. This is for the open end of you pillow. Do this to both pieces of your pillow.


Step 2
Place your to pieces together. Ensure the raw edges of your open endd are facing out on both sides of your pillow. I used a ruler and a pencil to lightly mark my stitch lines.
Sew 3 straight stitches to make your pillow. Remember, only 3! That one side is open so you can stuff your pillow case.
Snip the 2 corners off so you can get sharp points when you flip the pillow inside out. Trim any extra fabric away, but not too close to your stitches.

Step 3
You can either make a proper pillow to stuff in your pillow case, or just jam some cotton filler in for the time being. I didn't have the time to make the extra pillow inserts!
I then used little velcro tabs glued to the pillow and the mattress to ensure the pillows would stay in place when Miss Kitty played, but could also be removed and changed if needed.

 |
| Small velcro tabs |
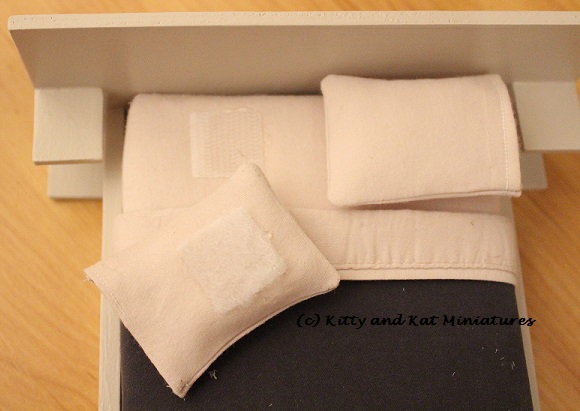 |
| Pillows with tabs attached |
The Sheets
Step 1
Cover your mattress with the pillow case material. I used Aleene's Fabric Fusion glue to adhere it to the foam core and the fabric to the fabric once I added the top sheet.

Step 2
Don't reinvent the wheel. When your pillow case gives you some nice banding with a rolled edge, take it and run with it! That banding became the finished edge to the top sheet as it was folded over the comforter. Voila, one less thing to sew.


Step 3
I decided I didn't care to ever see the top sheet separate from the comforter, so I made them one piece. The top sheet is just a "faux top sheet." Sort of like those sweaters with the white collar sewn into them so it looks like you layered, but really didn't.
Sew the top sheet piece to your comforter (see picture) using a straight stitch.

When you fold over the top sheet piece, it hides your stitch.

I used a straight stitch on the ends to ensure the top sheet would never flip back over, but if its tucked under, you can omit this step. Purely optional.

Flip the comforter over and trim off any extra top sheet material that isn't needed.

Step 4
I then wrapped my comforter/top sheet combo around the mattress and glued it down using Aleene's Fabric Fusion. I suggest placing a piece of plastic on the glued down side then putting a heavy book on it to weight it down. It takes a while to get the glue to set.
Then, I applied (and glued) a strip of velcro to the mattress and the bed to ensure it was secure but still removable.

The Finished Product


No Sewing Machine? It's OK!
I wish I could say that you could do all this with iron on hemming, but you can't. The bedding could be done, but the pillows would kill you. Burnt finger tips and you wouldn't get the crisp lines and neat corners, so your best be would be to hand stitch.
As soon as I was done I wanted to make a million pillows, but it was almost midnight and I stopped myself. By the next morning, as the coffee was hitting my veins and Sesame Street was on in the background, the pillow urge had most definitely passed. Phew!


