The charity auction camper is done! And the project is 99% complete. I'm still waiting on the faux grass sheets to arrive from China. Then I can secure the camper to its mount board and attach the camp accessories (outdoor shower and hammock).
It's been a nice fun break from from making serious minis. Sometimes you need a bit of fun and silly in your life. I'm mentally preparing for the mid-century build again, but I haven't quite got into the spirit.
It's Travel Time!
As I had previously posted the kit comes with its pre-assembled trailer. The rest needs assembly, but the worst is already done for you.
The Interior
The kit is definitely 1:18 scale (Lundby scale). That's why I gravitated to it, as I knew I could put Calico Critters (Sylvanian Family) in it. And as I have learned, the pre-school kindergarten set LOVE Calico Critters.
The flooring is a textured wood print paper which was sealed with ModPodge in matte finish. The kitchen area is straight from the kit. However, the oven was bashed to have a rack inside. I also changed all the finish colours and added in a "marble" counter and mirrored back spash. My little oven knobs are tiny rhinestones I painted silver.
The bed was also a bit of a bash, as I upholstered the entire structure and made my own bedding. A little boho chic!
Living Space
The kit came with wires and a battery back for lighting. I can't say I was a fan of the DIY fixtures they expected you to make. I found them to really look primitive and take away from the overall feel of the space (and looked out of scale!).
Instead, I made two globe lights that sit on each of the built in benches. The wires run underneath and out to the battery box.
The Exterior
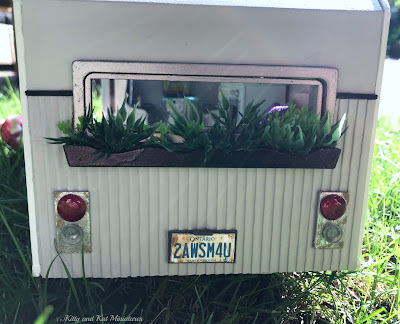
The box the kit came with was too small for the battery pack. I think they intended it to be glued underneath the trailer. I made a larger box, hinged it and decorated it with some bumper stickers.
The rear tail lights are pushpins! The red pushpins were originally pink. I used Testor's gloss red to make them into break lights. The clear back up lights are a clear plastic pushpin I sawed in half. The license plate was sourced via Google images.
And in other spurts of creativity...
I purchased another mini room kit from China. This one was usually around $22 CDN, but on Amazon I scored it for around $7. Mind you, it was missing a lot of the kit components, as I suspect these were the rejected kits, but the MDF sheets were perfect and save me a lot of time. So I'll also be making that kit up for the auction. I can get a Calico Critter into it too!
We made a family trip the Canadian National Exhibition and I purchased a few mini things!
When my grass arrives, and I finish the last bits of the trailer I'll post a few more pictures of it!


