Sunday, June 28, 2015

Lisa of Denmark meet Kat of Canada


When I bought the Lisa of Denmark set at the antique sale I got it as part of a group of mini items.  It looked retro and interesting, so I thought, why not?  Lisa of Denmark was bought out by Lundby, so I assume  its 1:18 scale.  Read more about Lisa of Denmark on Dollhouses Past and Present.

It was sitting in its boxes begging to come out and be styled.

I was a little stuck for scaled items for the scene, but I dug out a few. My retro starburst mirror worked!  How much more retro does a beige and brown corduroy sofa and chairs get?  I even found some "vintage" inspired paper. The scene left me with an urge to scout out my local GoodWill store for its real life sized clone. I plunked a pagoda and the coffee set on the table. The carpet is a 1:12 runner.

Sadly, my grey wood staging wood floor will be glued on to the 1:24 house I've been tinkering with in the background.   More on that soon. My room box is slowly progressing so I will have to wait on that floor to be finished. On Canada Day I plan to bust out the table saw to give it a base.


Ordered cabinets from Ikea for Miss Kitty`s play room.  `Besta`cabinets everywhere.  Door fronts in a separate order that hopefully arrives this week.  It`s an Ikea typhoon in my basement.  I like assembling it, one of those weird people that enjoy Ikea assembly.  What I hate is attaching them to the wall with their anti-tip hardware.  I would rather assemble a 1:144 Victorian dollhouse with a blindfold on.  Rum and coke time.


Monday, June 22, 2015

Granny Chic Scene


Motivation for Miss Kitty's dollhouse attic has stirred.  I bought some wood for the bunk beds.  It's about time I start.

This past weekend I went to The Little Dollhouse Company store.  Things got a little crazy....spent a bit and got lots.  Thankfully I took a small shopping basket to keep me in check or things would have gotten out of control.  And I bought a side-by-side room box. Yes, I have an Orchid waiting to be started, but I wanted something to make pretty rooms with and have fun with on the way.

But, I made another little scene, this one I call "Granny Chic" because the wallpaper is both retro and on trend.  The runner is made from fabric samples from Bouclair's upholstery swatches.  I had to wait for the clerk to wander away so I could fill my pockets (yes, they were free).  Almost all the furniture is from various trips to The Little Dollhouse Company.  The blue prints I had kicking around from PrintMini finally found a home!  The basket is actually resin, but feels like wicker.


The mirror was an amazing find on Etsy from Melissa's Miniwereld in the Netherlands.  She makes lasercut 1:12, 1:24, and 1:48 kits and furniture from thick cardboard.  It's half the price of wood but paints and looks the same when finished.  Check her store out!  I painted the frame with Testors 'aluminum' and burnished it with a black paint pen.

Thursday, June 18, 2015

Sunday, June 14, 2015

A Little Something....


Survived the birthday party, illness and party prep/cleaning.  Back to mini making I go....once my cold clears up.

Hello attic space.....I'm coming for you.

But, here is a little vignette until I get started. 

Saturday, June 13, 2015

Happy Birthday

Happy 2nd Birthday Miss Kitty!

You're the Kitty to my Kat. You're the cutest little monkey I know

Hopefully, Mommy will finish your dollhouse before your next birthday!


Wednesday, June 10, 2015

The Master Bedroom Reveal!


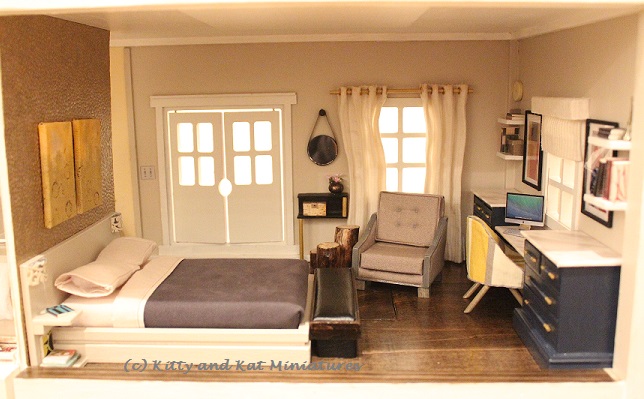
The master bedroom had many mini firsts for me.  I made a bed and linens with a sewing machine (having never sewed with a sewing machine before).  I made 2 dressers with pull out drawers along with 2 chairs and a bench from scratch.  And those damn grommet drapes too.  Don't even remind me about closing the hole in the floor!


The Beginning


The hole in the floor was a challenge.  My 2 posts on it here and here were enough said.  But its rock solid.  Kat 1, Floor 0.


Behold The Drapery


Having neglected to include the final shot of the drapes hanging in my grommet drape post, I ensured I had an unobstructed view for you.


The Reading Nook (aka Where I Would Drink My Wine)


You can finally see the asymmetrical leg I added to the former floating shelf.  It reminded me of something I had seen at Crate and Barrel.  The small box is wood wrapped in birch bark from my neighbours tree.  I found lots of bark in the spring.  The flowers are painted baby's breath and a bead for vase.

The wood log side table is a look that I have seen everywhere in stores.....high and low end.  I decided to recreate it by peeling the bark off some dried branch, then sealing it in a gloss urethane.  


The Desk (aka Where The Husband Would Be Glued To Work)


I'm really pleased with my dresser and desk combo.  I would definitely do this in my house!  The tea set was a gift from my grandmother.  It is from the 1940's, unmarked, but matches my decor.


The Bed (aka Where I Go To Ignore The World)


The bedside lights are something I will post about later.  But they're made of thin aluminum and covered with a vine pattern cupcake wrapper then sealed.  

The wall behind the bed is covered in a gold metallic embossed paper I purchased at Michael's.  I first used a semi gloss clear spray paint to seal both the front and back (the front side took 2 coats).  I then glued it on with Mod Podge.  My original paint didn't have enough umph, so I went bold with the accent wall.


The Accessories


I had to restrain myself with the accessories, Miss Kitty is very, very interested in them and will try to pick them off if I'm not watching.  She's not being destructive, she just wants to see them and make her dolls play with the bits.  They are now WELL glued in place.  

The Eiffel Tower is a standard jewelry charm from Ebay, I just snipped the loop off and spray painted it.  The elephant is a *cough* vintage *cough* piece from my childhood.

The statue circle art thingy is a bead that I drilled into and stuck some wire in.  I blew one bead apart using my power drill.  Hand drill it is!

The 2 paintings are by Picasso....aka me.  I grabbed some canvasses from the dollar store and re worked them.


Me And The Husband


The husband would not be allowed shoes in the bed.  I can't tell if I've finished my glass of wine or haven't started the bottle yet.  It's all so fuzzy when you don't share your wine......

And I hope I wasn't blogging at the iMac while intoxicated! My potty mouth is bad enough sober!


Voila!  The master bedroom is done.  I have the attic space to tackle next.  It's all planned out and ready to execute.  However, Miss Kitty has her 2nd birthday shortly, so the Pinterest mom I am, I've been Elmo and Sesame Street crazy.  The basement is a sea of crepe paper characters and assorted craziness.  That said, things will have to slow down until I get through the birthday. 

 Oh, and I have another smaller dollhouse started as a Christmas gift for another little girl in my life.  Still haven't started the Orchid kit in the basement.  6 months and counting......

Tuesday, June 02, 2015

The Jump To .com


In exciting news (for me at least), I am the proud owner of kittyandkatminiatures.com!  Nothing changes here, I'm still using Blogger to host the website, but I am the master of my own domain......officially.

And I also posted the mommy and daughter plastic version of Miss Kitty and Kat (me!).  Miss Kitty does have her own tool bench with tools in my furnace room, right beside mommy's work bench.  The objects I included in the picture best sum me up, but they're always open to interpretation.  And I do try not to drink wine and sew too often.....at least 30% of the time.

And thank you to the over 12,000 people that have visited my blog since the beginning of 2015 (and the start of the blog).  I am overwhelmed with happiness from all the support and comments!


Monday, June 01, 2015

Playing With Drapes


The bedroom drapes were a yet again a "try something new" moment inspired by a dollar store visit.  I have an independent party/dollar store near me that I discovered a few months ago.  Amazing craft section!  But, in the hardware area they had a grommet press (like a hole punch) with tons of tiny grommets for $2.50.  I couldn't resist.  All I could think about were drapes.

What I Did


I pre-washed my fabric to remove some of the sizing and make it easier to pleat.  Each panel is roughly double the width of the window (like real drapes).  I then, using my sewing machine, hemmed the top, bottom and sides. 

I made rough folded pleats to determine where my grommets should go.  It really depends on the look you want for your pleat.  Also, in my case, the fabric was thicker, like upholstery fabric, so it didn't have a flow to it, therefore, tight pleats worked well.

Something New!

After placing my grommets and being left with a sore hand, I used my iron to press the pleats into the drapes.  I normally would have used my paint brushes to act as my pleater with my fabric soaked in glue water.  This time I wanted to see if iron pleating would be an improvement.  Also, the fabric is thicker and stiffer then normal, so I was worried it might not drape over the paint brushes.  I still wanted the glue bath to set the drapes and make the pleats hold over time.

Iron pleated

The Sticky Bath

I mixed about 1 shot glass worth (3oz?) of white glue into 1/4 cup of warm water.  


Then soaked the iron pleated drape in the bath, careful not to submerge the metal grommets.


I put strips of wax paper between the now wet pleats.  I was worried the drape would dry into a single pleat.


Then I placed the drapes between 2 books (covered again in wax paper).  Grommets were left out to stay dry.  After 24hrs I still found them rather damp, so I took the books away and lay them on a towel.  I think this is what caused a bit of the crumple in the drapes, but I was too lazy to fix it.


Science Sucks

What happens when water meets metal and they mingle for a while? RUST.  The thought didn't escape me.  No, I had the thought as the panels were soaking.  I literally ran down to my basement the following morning hoping there would be no rust on the WHITE drapes.  Incorrect.  I would therefore consider marking, but not grommeting, until after the drapes are glue soaked and dried.

While nicely pleated, there was some rust around the grommets.  I was able to grab some ivory coloured paint and touch up the fabric.  All was well!


Finishing It Off


I was smart (for once) and had found a dowel that went through my grommets BEFORE I started the project.  Did you feel the earth move?  I painted the dowel gold and fed the drapes on.  Very, very snug and lots of fiddling but I got them on!


I mounted the eye hooks into the wall.  The drapes are stiff enough that even if the drapes are tugged, the drape is tough and long enough to support the hooks from ripping out.  


Annnnnnnnd, you might say, but what do the drapes look like up?  Ha.  Forgot to take that picture.  Oops.  It will be in the bedroom reveal photos!