Taking pictures of your minis is very important if you like to blog or share your work on social media. You put all this hard work into building and styling the most perfect miniatures, and if your pictures aren't crip and true, then it feels (at least to myself), that no one can see what I really want to see and feel.
Let us look back, way back, to the original pictures on this blog. I owned a Blackberry at the time, so I relied on my Canon camera to take photos. I didn't know about the importance of natural light and everything looked yellow. Every shot, I thought, I looks like someone peed on the picture!!
It look a few years, an iPhone and some inspiration to bring my minis out of the basement and up to a window. The inspiring Nesha Kay (IG @nesha_kaye) is an amazing photographer, scene setter and 1:6 Barbie/Fashion Royalty artist. I saw a few of her Instagram posts about putting her room boxes by windows for light, and to capture the outdoors through the room box window. This was revolutionary stuff for me!
Mini photography can be done well at any budget or location. I am no expert, but I've always loved photography and maybe my mistakes and discoveries can help you!
Natural Light
Move your house to your brightest window or you sun/shade window. Turn it, and see how the light cuts through windows and casts shadows. If the view through your windows stinks, try printing backgrounds.
The drawbacks? Well, it can't be photographed at night. And your best light often is for maybe an hour a day at that location so be prepared to shoot or move your house around your home.
Artificial Light
Lighting was once really expensive to buy. I would look at camera stores and cringe. But with the advent of TikTok and YouTube, cheap and easy LED lighting is available everywhere.
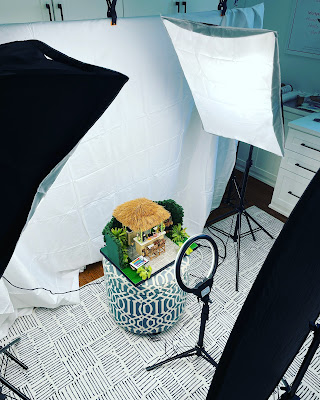
I purchased an entire lighting rig for under $100 on Amazon. It takes a while to assemble (and put away), its amazing. Watch for sales, because there's always a similar set available. What these lights do is allow you to light from the left and right and front/top at the same time, removing shadows or weird tinges to your photos. You don't even need to have the most amazing phone camera, because the lights make up for it. Need to shoot at midnight? Rainy dull day? No problem! My husband jokes it looks like the Sears Portrait Studio in my office when its set up.
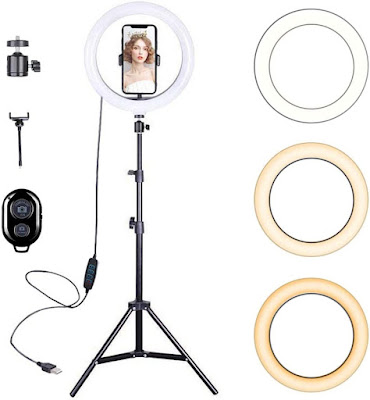
An even more simple and cost effective solution is an LED light ring. You can purchase ones the clip to your cell phone and surround your camera. Or you can purchase a large one that connects to a stand. My ring can screw into a stand, or unscrew it and I can place it under my chin, on the roof of the house, etc. to cast the right light/shadows no matter how awkward the space is or the time of day. A good LED light should have 3 light colours, such as warm white, cool white and warm yellow light. Mine also has 4 levels of brightness for each colour. It's just 3 simple buttons to press on the ring light, so nothing complicated. Below is something similar to what I own. It was $35 on Amazon and connects using a USB to a plug.
Combination Lighting
When photographing a dollhouse, you often have deep rooms that make it difficult to get light into. This is where the ring light comes in handy. You can have the pleasant natural light come through a window, but by positioning the ring light a little bit away from the house, but in front of the room, and matching the light colour and brightness to your ring light to the natural light, you can fill the space with light. Your photos won't be dark anymore!
Backgrounds
I would clip magazine images and tape them to books for scenes outside my windows. But that requires lots of repositioning depending on the angle you are shooting from. It's very annoying to have a great shot then realize half the window has a book in it.
You can get great landscape shots from Pixabay (thanks Kristine of Paper Doll Miniatures) and expand them in Word to fill a page. I often just print on legal size paper at home and tape a few sheets together. I then tape it to a book outside the window and voila! something nice to see. Some miniature magazines also come with a free background image page you can remove and use too.
There you have it! I hope this helps you all a little bit or at least shows you that there are lighting options out there that will better showcase your hard work and won't break the bank.
Hugs!
Kat


